Key Value Stores
Overview
In this tutorial, we will show how to leverage key-value stores, using Klotho annotations. We will walk through examples of using Klotho with DynamoDB and Redis.
Why?
Different applications require different data stores. Key-value stores allow for flexibility in field definition of data types as opposed to structured relational databases.
Getting started with Key Value Stores For DynamoDB
Prerequisites
- Klotho CLI installed
curl- Node.js 16.x+ (& NPM)
- TypeScript
Repository
Clone our sample apps git repo and install the npm packages for the ts-microservices app.
git clone https://github.com/klothoplatform/sample-apps.git
cd sample-apps/ts-microservices
npm install
App Overview
The ts-microservices application utilizes the following annotations
- index.ts
- users.ts
/**
 * @klotho::execution_unit {
 *   id = "microsrv-api"
 * }
 */

import express = require('express')
...

/* @klotho::expose {
 *  target = "public"
 *  id = "app"
 * }
 */
app.listen(3000, async () => {
  console.log(`App listening at :3000`)
})
/**
 *
 * @klotho::execution_unit {
 *   id = "microsrv-users"
 * }
 */

/**
 * @klotho::persist {
 *   id = "users"
 * }
 */
const users = new Map<string, string>();
Klotho compile the application
Let's start by compiling our TypeScript application into JavaScript.
npx tsc
Then we'll compile the application using Klotho.
klotho . --app myfirstapp --provider aws
██╗  ██╗██╗      ██████╗ ████████╗██╗  ██╗ ██████╗
██║ ██╔╝██║     ██╔═══██╗╚══██╔══╝██║  ██║██╔═══██╗
█████╔╝ ██║     ██║   ██║   ██║   ███████║██║   ██║
██╔═██╗ ██║     ██║   ██║   ██║   ██╔══██║██║   ██║
██║  ██╗███████╗╚██████╔╝   ██║   ██║  ██║╚██████╔╝
╚═╝  ╚═╝╚══════╝ ╚═════╝    ╚═╝   ╚═╝  ╚═╝ ╚═════╝

Adding resource input_file_dependencies:
Adding resource exec_unit:microsrv-users
Adding resource exec_unit:microsrv-api
Found 2 route(s) for middleware 'router'
Adding resource gateway:app
Adding resource persist_kv:users
Adding resource topology:myfirstapp
Adding resource infra_as_code:Pulumi (AWS)
Pulumi.myfirstapp.yaml: Make sure to run `pulumi config set aws:region YOUR_REGION --cwd 'compiled/' -s 'myfirstapp'` to configure the target AWS region.
In the ./compiled directory, you'll find the Infrastructure-as-Code for your cloud-native application ready for deployment.
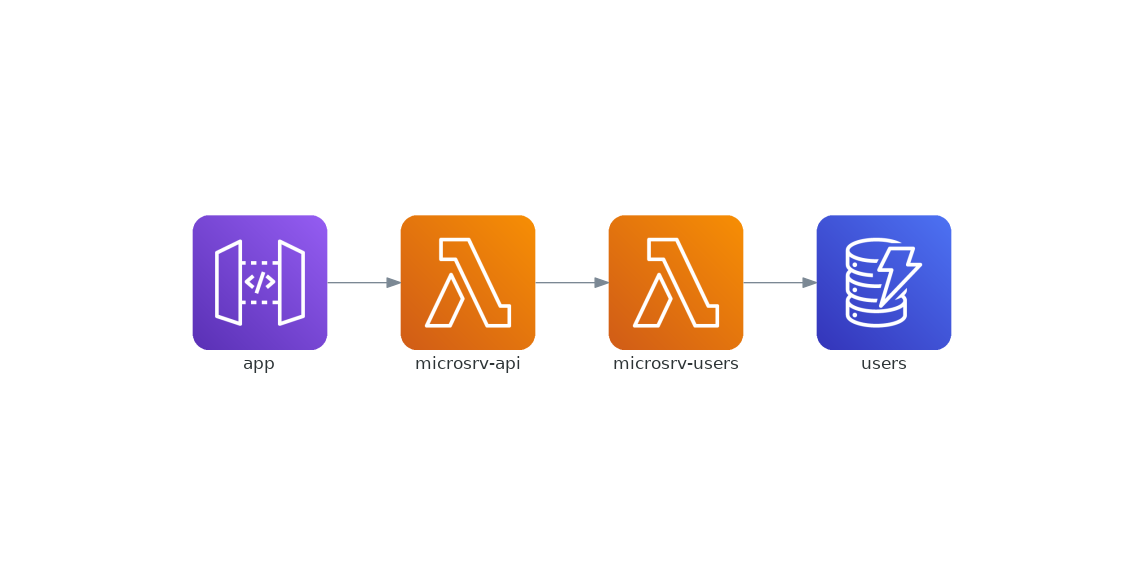
You'll also find a file called myfirstapp.png, visualizing the topology output of your compiled application:
Deploying the application
To deploy the application, refer to the deploying guide.
Getting started with Key Value Stores For Redis
Prerequisites
- Klotho CLI installed
curl- Node.js 16.x+ (& NPM)
- TypeScript
Repository
Clone our sample apps git repo and install the npm packages for the ts-redis app.
git clone https://github.com/klothoplatform/sample-apps.git
cd sample-apps/ts-redis
npm install
Application Overview
The ts-redis application utilizes the following annotations
- index.ts
/*
 * @klotho::execution_unit {
 *  id = "redis-main"
 * }
 */

import * as express from "express";
import { createClient } from 'redis';

const setupRedisClient = async () => {
  /*
  * @klotho::persist {
  *   id = "redis"
  * }
  */
  const client = createClient({socket: {
    keepAlive: 5000
  }})
  await client.connect()
  return client
}
...

/*
 * @klotho::expose {
 *  target = "public"
 *   id = "redisApp"
 * }
 */
app.listen(3000, async () => {
  console.log(`App listening locally`);
});
Klotho compile the application
Let's start by compiling our TypeScript application into JavaScript.
npx tsc
Then we'll compile the application using Klotho.
klotho . --app myfirstapp --provider aws
██╗  ██╗██╗      ██████╗ ████████╗██╗  ██╗ ██████╗
██║ ██╔╝██║     ██╔═══██╗╚══██╔══╝██║  ██║██╔═══██╗
█████╔╝ ██║     ██║   ██║   ██║   ███████║██║   ██║
██╔═██╗ ██║     ██║   ██║   ██║   ██╔══██║██║   ██║
██║  ██╗███████╗╚██████╔╝   ██║   ██║  ██║╚██████╔╝
╚═╝  ╚═╝╚══════╝ ╚═════╝    ╚═╝   ╚═╝  ╚═╝ ╚═════╝

Adding resource input_file_dependencies:
Adding resource exec_unit:redis-main
index.js:42:0: Found 2 route(s) on server 'app'                                                                                                                                                                                           var: app
Adding resource gateway:redisApp
Adding resource persist_redis:redis
Adding resource topology:sample
Adding resource infra_as_code:Pulumi (AWS)
Pulumi.myfirstapp.yaml: Make sure to run `pulumi config set aws:region YOUR_REGION --cwd 'compiled/' -s 'myfirstapp'` to configure the target AWS region.
In the ./compiled directory, you'll find the Infrastructure-as-Code for your cloud-native application ready for deployment.
You'll also find a file called myfirstapp.png, visualizing the topology output of your compiled application:

Deploying the application
To deploy the application, refer to the deploying guide.
Additional Redis Functionality
To continue exploring redis functionality, visit the redis documentation. Since Klotho's annotation is built on top of the redis client, you can make use of other built in features such as, pubsub, caching, and many more!